
If I reuse the wrong device, skip a log, or miss a failed test, my clinic can face infections, fines, license trouble, or shutdown. That’s the core message here.
In plain terms, I need to do three things right every day:
- Sort each item by risk using Spaulding Classification:
- Critical: enters sterile tissue or blood → sterilize
- Semi-critical: touches mucous membranes or broken skin → high-level disinfection or sterilize
- Non-critical: touches intact skin only → low-level disinfection
- Use the right process for the device and the manufacturer’s instructions:
- Steam autoclaves are the main standard for heat-safe tools
- Common steam cycles include 250°F (121°C) for 30 minutes or 270°F (132°C) for 4 minutes
- Prevacuum units need a daily Bowie-Dick test
- Failed biological tests mean I stop using the sterilizer and reprocess affected items
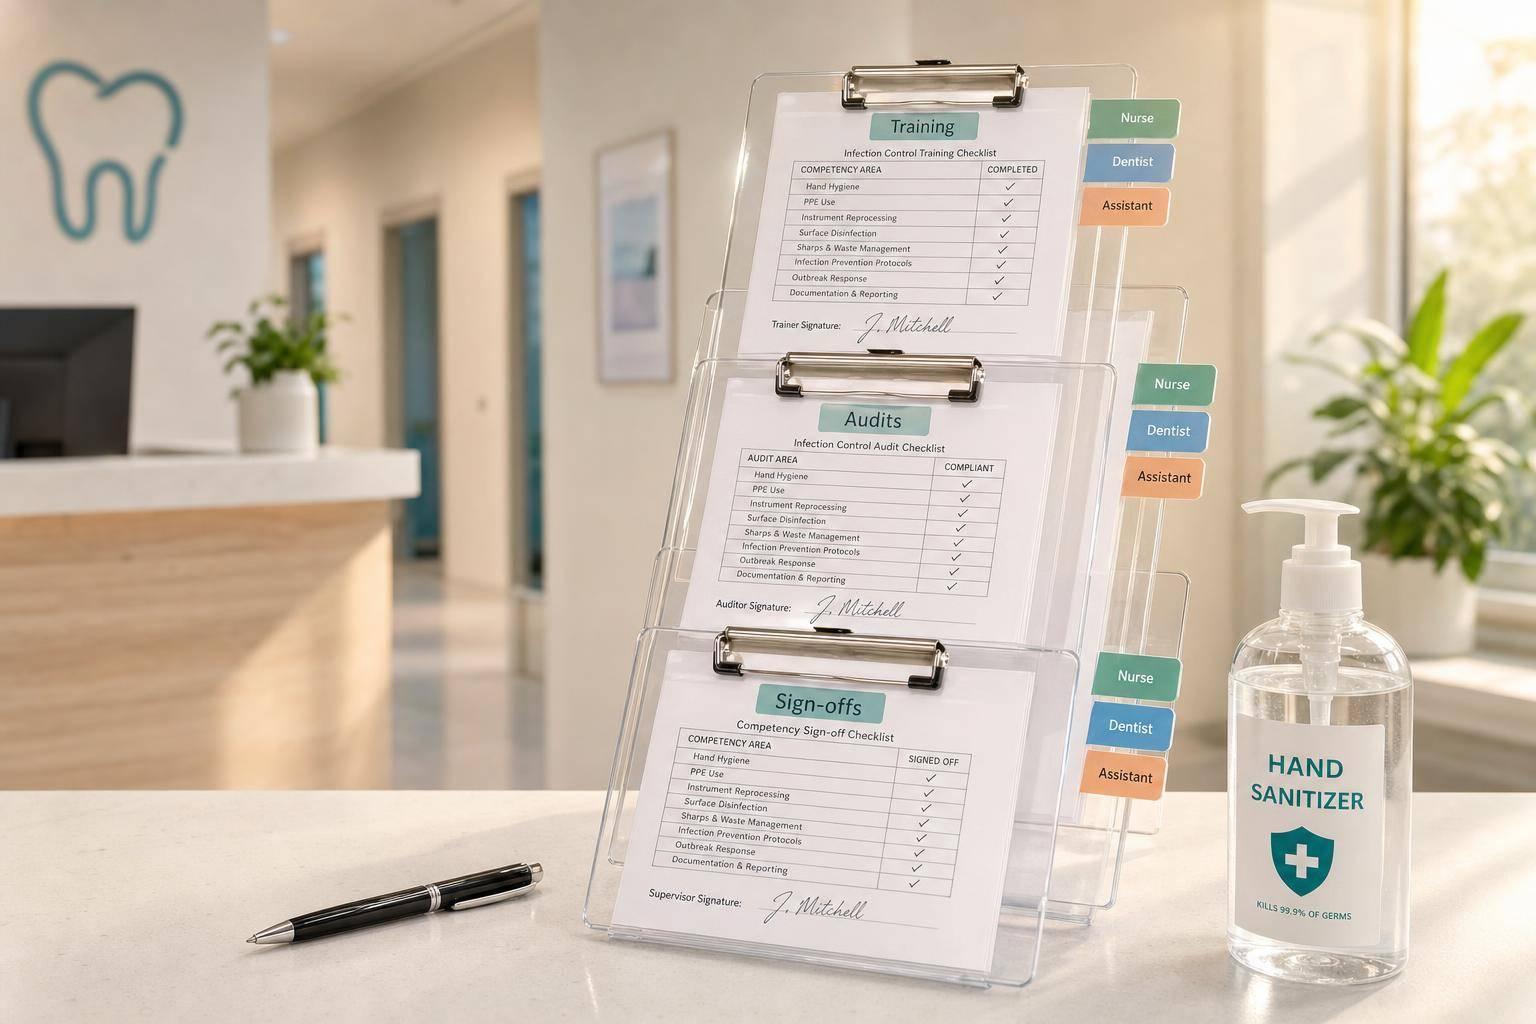
- Keep records that can stand up to an inspection:
- Every inventory and cycle log
- Chemical and biological indicator results
- High-level disinfectant test results each day of use
- Staff training and annual skill checks alongside digital intake protocols to ensure patient safety from the moment they enter the clinic
- Maintenance and repair records
A few points matter most:
- Cleaning always comes first because debris can block disinfection or sterilization.
- Single-use items stay single-use, including needles, syringes, cannulas, and microneedling cartridges.
- OSHA, CDC, FDA, and state boards each have a part in what my clinic must do.
- Dirty and clean areas need clear separation to stop cross-contact.
- Written SOPs need physician review, version dates, and staff follow-through.
Bottom line: if I classify tools the right way, follow device instructions, monitor each cycle, and document every step, I put patient safety first and keep the clinic ready for review.
Sterilization Requirements and Regulatory Standards
Before you pick a sterilizer or draft a reprocessing protocol, you need to sort instruments by risk and know which agencies set the rules. If that step goes wrong, you can end up with compliance problems and a higher infection risk.
How to Classify Instruments by Risk Level
The Spaulding Classification is the standard framework U.S. clinics use to determine the right level of reprocessing. It groups devices by the part of the body they touch.
| Risk Category | Definition | Aesthetic Examples | Required Processing |
|---|---|---|---|
| Critical | Enters sterile tissue or the vascular system | Needles, scalpels, lancets, extraction tools, surgical burs, biopsy forceps | Sterilization |
| Semi-critical | Touches mucous membranes or non-intact skin | Microneedling tips, microdermabrasion tips, chemical peel applicators, certain handpieces | High-Level Disinfection (HLD) or sterilization |
| Non-critical | Touches only intact skin | Blood pressure cuffs, treatment beds, laser handpiece surfaces, countertops | Low-Level Disinfection (LLD) |
Single-use disposables should stay single use. If a component is made for one-time use, discard it after use. That risk category tells you what comes next: sterilize it, put it through high-level disinfection, or throw it away.
Once you classify the instrument, the rest of the reprocessing workflow is much easier to map out.
Cleaning, Disinfection, and Sterilization: Key Differences
These terms don't mean the same thing. Each one refers to a different process and a different end result.
Cleaning is the physical removal of visible soil, including blood, tissue, and other residue, using water and a detergent or enzymatic cleaner. It's the first step every time. If debris stays on the item, it can block disinfectants and sterilants from reaching microorganisms, which can make the next step fail if cleaning is skipped.
Disinfection kills most pathogens, but it may not kill bacterial spores. Low-level disinfection works for non-critical items such as treatment tables and countertops and should be done with an EPA-registered hospital disinfectant. High-level disinfection is used for semi-critical items and depends on the exact concentration and contact time listed on the product label.
Sterilization destroys all microbial life, including bacterial spores that are hard to kill. Any tool that pierces the skin or enters normally sterile tissue must be sterilized.
For environmental surfaces, start with cleaning. Disinfect those surfaces when blood or other contamination is present. And this part matters: follow the manufacturer's reprocessing instructions exactly.
CDC, OSHA, FDA, and State Oversight Explained
Four groups shape how aesthetic clinics handle reprocessing, and each one covers a different part of the job.
| Agency | Primary Role | How It Applies to Your Clinic |
|---|---|---|
| CDC | Sets clinical infection control guidelines | Evidence-based recommendations; Category IC guidelines are required by state or federal regulation |
| OSHA | Protects workers from bloodborne pathogens and chemical exposure | Requires PPE training, exposure plans, and safe sharps handling under the Bloodborne Pathogens Standard |
| FDA | Regulates sterilization equipment and chemical sterilants | Autoclaves and liquid chemical sterilants/high-level disinfectants must be FDA-cleared; label claims for concentration and contact time are binding |
| State boards and local health departments | Oversees licensing and facility operation | Inspections, written protocol requirements, and fines or license suspension for non-compliance |
Federal rules set the floor. State and local agencies may add licensing, inspection, and written protocol rules on top of that. Since state requirements differ, check your state board and local health department rules before a renewal or inspection.
Those rules shape the sterilization method, the equipment you can use, and the records your clinic needs to keep.
sbb-itb-02f5876
Sterilization Methods and Equipment Standards
After classification, the next step is picking the method that fits the device, the manufacturer's IFU, and inspection-ready compliance. In practice, that decision comes down to three things: what the instrument is made of, what the manufacturer's instructions say, and what level of reprocessing the Spaulding Classification calls for.
Steam Sterilization: The Primary Standard
For critical instruments, steam sterilization is the default choice unless the device can't handle heat or moisture. In most aesthetic clinics, that means the autoclave is the main sterilizer. The CDC states:
"Of all the methods available for sterilization, moist heat in the form of saturated steam under pressure is the most widely used and the most dependable."
Steam sterilization is a good fit for critical and semi-critical instruments that can handle heat and moisture, such as stainless steel extraction tools, tweezers, and scissors. The two common cycle temperatures are 121°C (250°F) and 132°C (270°F).
For wrapped supplies in a gravity displacement sterilizer, the minimum exposure time is 30 minutes at 121°C. In a prevacuum sterilizer, the minimum exposure time is 4 minutes at 132°C. Use external and internal chemical indicators on every pack, and follow the manufacturer's instructions for use (IFU) exactly. Cycle time and temperature can differ by instrument type.
Low-Temperature Methods and Liquid Chemical Processing
If steam would damage the device, use a validated low-temperature or liquid chemical process that matches the manufacturer's IFU. Some plastics, electronic parts, and delicate handpieces will break down at autoclave temperatures.
For those items, clinics usually have two options:
- Low-temperature sterilization systems such as hydrogen peroxide gas plasma or ethylene oxide (EtO)
- Liquid chemical processing with an FDA-cleared high-level disinfectant (HLD) such as glutaraldehyde or ortho-phthalaldehyde (OPA)
Liquid chemical processing requires full immersion for the labeled contact time, which is usually 12 to 90 minutes. After soaking, instruments must be rinsed with sterile water to remove chemical residue that can irritate tissue.
| Method | Use Case | Typical Parameters | Material Compatibility | Key Limitation |
|---|---|---|---|---|
| Steam (Gravity) | Critical/semi-critical metal tools | 121°C (250°F) for 30 min | Heat/moisture-tolerant metals, some plastics | Can damage heat-sensitive items |
| Steam (Prevacuum) | Porous loads, wrapped instruments | 132°C (270°F) for 4 min | Heat/moisture-tolerant metals, some plastics | Requires daily Bowie-Dick testing |
| Low-Temp (Gas Plasma) | Heat-sensitive critical items | Varies by equipment | Plastics, electronics, delicate components | More expensive; requires specific packaging |
| Liquid Chemical (HLD) | Heat-sensitive semi-critical items | 12–90 min immersion | Heat-sensitive items | No permanent cycle record is created; requires sterile water rinse |
Equipment Requirements, Indicators, and Maintenance
Use only FDA-cleared sterilizers, sterilants, and high-level disinfectants for the cycle and load they are meant for. Maintenance and cycle monitoring are what keep the equipment dependable between inspections.
Monitoring happens on three levels. Mechanical indicators, such as printouts or graphs showing time, temperature, and pressure, show whether the cycle ran as intended. Chemical indicators, placed both outside and inside every pack, help show that the required conditions were reached. Biological indicators (BIs), which use Geobacillus stearothermophilus spores, give the strongest proof that the sterilizer is doing its job.
For prevacuum sterilizers, a Bowie-Dick test must be run every day the sterilizer is used, before the first load, to check for air leaks and poor air removal.
If a BI comes back positive or a Bowie-Dick test fails, take the sterilizer out of service right away. Keep it out of service until it passes repeat testing after repair. Any items processed since the last passing BI must be recalled and reprocessed. Keep sterilization logs for every cycle, including the date, instruments processed, cycle parameters, and staff initials. Cycle records, indicator results, and service logs are the proof inspectors expect to review.
These controls only work if the clinic follows a written reprocessing workflow and documents each step.
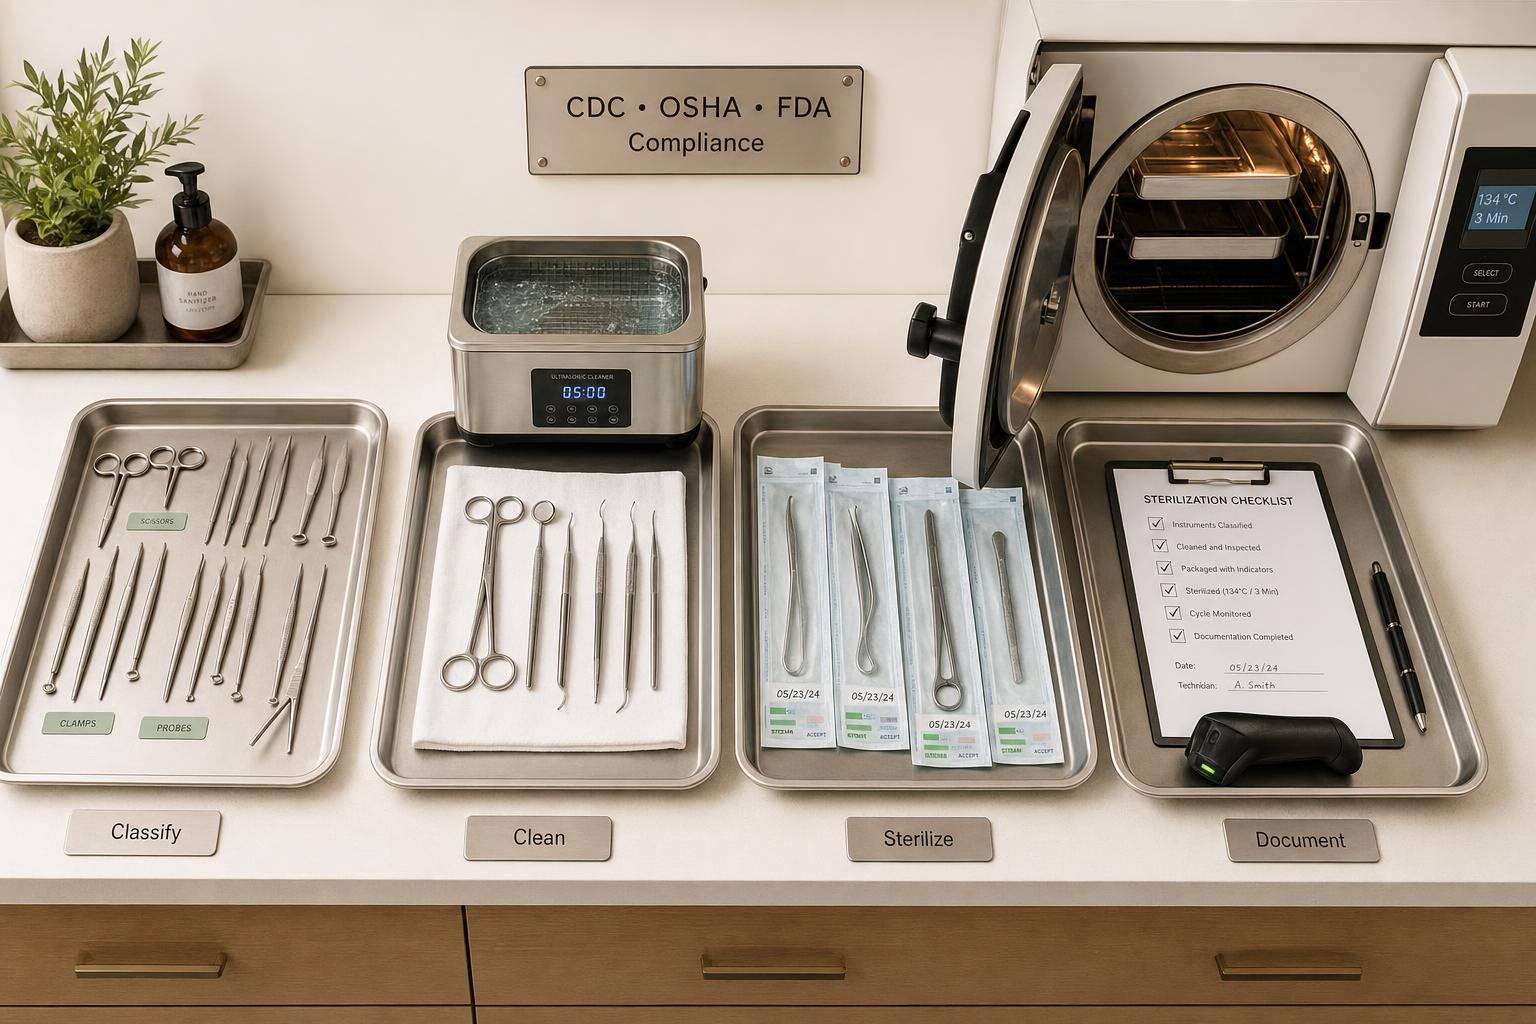
Instrument Reprocessing Workflow and Daily Compliance
Instrument Reprocessing Workflow for Aesthetic Clinics
Once you've picked the right sterilization method, the day-to-day workflow is what keeps you compliant. This is where small slips can turn into big problems.
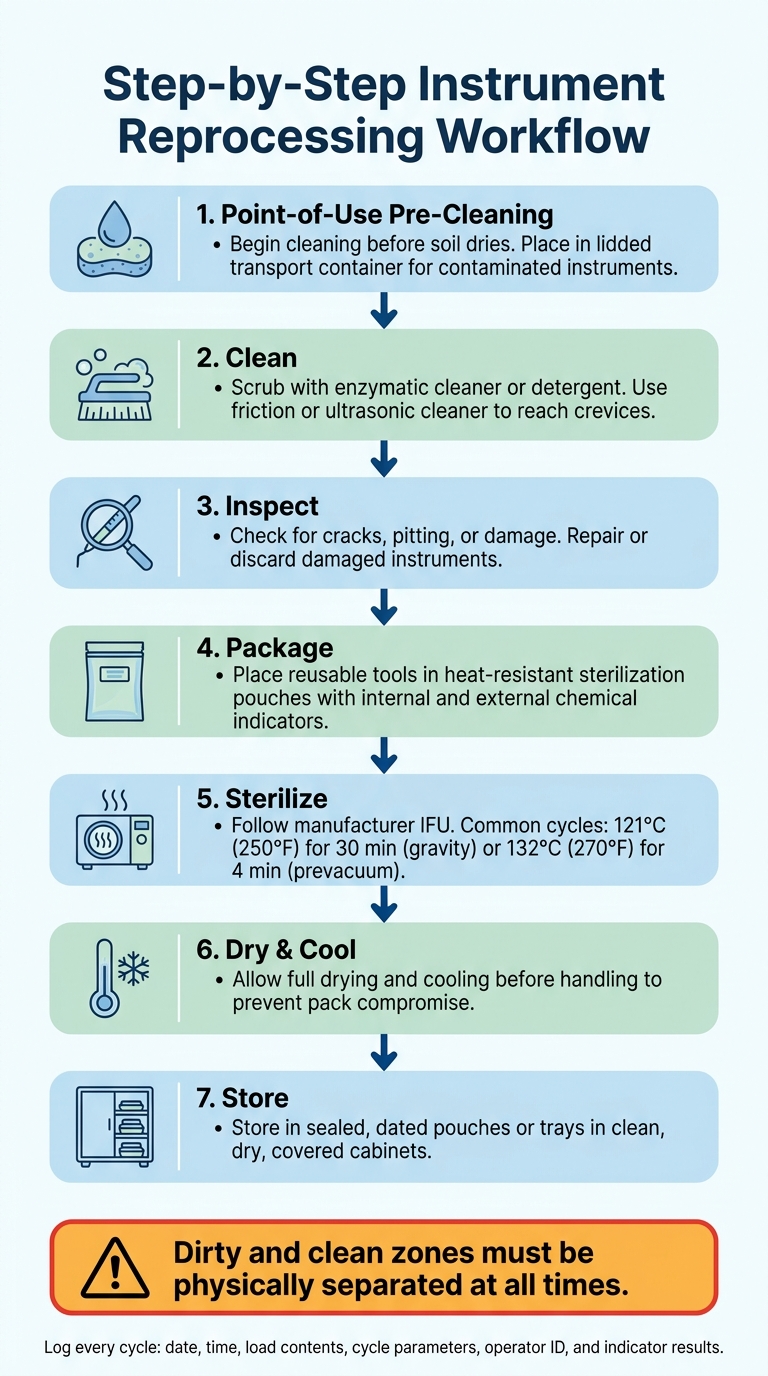
Step-by-Step Instrument Reprocessing Workflow
Start cleaning instruments at the point of use, before soil has time to dry. Then move them to the reprocessing area in a lidded transport container meant for contaminated instruments.
In the reprocessing area, stick to the same sequence every time:
- Clean with water and an enzymatic cleaner or detergent, using friction or an ultrasonic cleaner to reach crevices.
- Inspect each instrument for cracks, pitting, or other damage that could interfere with cleaning or sterilization. Repair or discard damaged instruments.
- Package reusable tools in heat-resistant sterilization pouches.
- Sterilize using the cycle in the manufacturer's IFU.
- Dry and cool all the way before handling so moisture doesn't compromise the pack.
- Store sterile items in sealed, dated pouches or trays inside clean, dry, covered cabinets.
The setup of the reprocessing area matters too. Dirty and clean zones need physical separation so clean instruments never drift back into the dirty zone.
Single-Use Devices, Sharps, and Medical Waste Handling
Some items don't belong in any reprocessing workflow because they're not meant for reuse at all. Needles, syringes, dermal filler cannulas, microneedling cartridges, and any device labeled single-use must be thrown away after one use.
Sharps should go straight into a puncture-resistant, leak-proof sharps container at the point of use. If a sharp drops or breaks, pick it up with forceps or another mechanical tool - never with bare hands. Blood-soaked gauze and other regulated waste should be separated into labeled biohazard containers. State rules for medical waste disposal vary, so it's smart to confirm local requirements.
How to Document Cycles, Tasks, and Training Records
Documentation is a core part of compliance. Every sterilization cycle needs a log entry with the date, time, load contents, cycle parameters, sterilizer ID, operator identity, and indicator results. If you use liquid chemical sterilants or high-level disinfectants, test the minimum effective concentration each day of use and record those results on their own.
Training records matter just as much. Staff competency for reprocessing tasks should be checked at hire and then at least once a year after that. Keep onboarding checklists and HIPAA training acknowledgments with the rest of the compliance file.
| Record Category | Required Data Fields | Frequency |
|---|---|---|
| Sterilization Cycle | Date, time, load contents, cycle parameters, operator ID, indicator results | Every cycle |
| HLD Testing | Chemical concentration results, date, solution reuse-life status | Daily (each day of use) |
| Staff Training | Competency verification, HIPAA acknowledgment, onboarding date | At hire & annually |
| Equipment Maintenance | Maintenance notes, repair dates, corrective actions taken | Per manufacturer schedule |
A HIPAA-compliant platform like Prospyr can keep sterilization logs, training records, and incident notes in one place, which makes audit prep much easier.
These records back up the written SOPs and competency checks covered next.
Policies, Staff Training, and Ongoing Compliance
Once the workflow is set, policies, training, and audits are what keep it steady day after day.
Written SOPs and Clear Accountability
Keep a physician-signed written policy and procedure manual that covers clinical treatment, emergency response, privacy, training, infection control, and waste handling. Your SOPs should match the reprocessing workflow already set for each device type. Written SOPs, training records, and cycle logs are the documents regulators look at during a review.
The Medical Director signs off on clinical protocols. It also helps to name an infection prevention lead to handle daily logs, while the Medical Director keeps oversight of protocol review. Each SOP should show a version number and the date of the last physician review. If equipment, services, or incidents change what the protocol needs to say, update the SOPs right away.
On paper, that sounds simple. In practice, it only works if staff follow those written steps the same way every time.
Staff Training and Competency Verification
Train staff on reprocessing, PPE, bloodborne pathogens, and chemical safety. Then verify the full reprocessing workflow by directly observing cleaning, sterilization or disinfection, drying, and storage. That hands-on check matters. A policy can look fine in a binder, but the day-to-day routine is where problems show up.
Document return demonstrations and annual competency checks. Those records show who was trained, what they were trained on, and when the check happened.
Using Audits and Analytics to Keep Standards Current
After training and SOPs are in place, audits show whether daily work matches the written standard. Review cycle logs for missing initials, indicator results, or cycles that fall outside the accepted range. Use audits to confirm that logs, training, and cycle reviews line up with what staff are doing in the clinic.
Set a formal annual SOP review with the Medical Director so policies stay aligned with changes in CDC guidance, state regulations, or equipment. If your state health department updates infection control rules in the middle of the year, trigger a review at that point instead of waiting for the next annual cycle.
Prospyr's task management and practice analytics tools can help keep compliance tasks visible and track review status.
These controls help keep the clinic inspection-ready and make gaps easier to spot before they turn into violations.
FAQs
How do I classify a device correctly?
Use Spaulding’s classification system to figure out the device’s risk level - high, intermediate, or low - and then use the matching decontamination or sterilization method.
What should I do after a failed spore test?
After a failed spore test, take the sterilizer out of service right away and review your sterilization process to spot what may have gone wrong. Recall and quarantine any implantable items from the suspect load. Don’t use them until sterility has been confirmed.
Run the spore test again at once using the same cycle. If the repeat test comes back negative and your team followed the process correctly, put the sterilizer back into service. If the repeat test is positive, have the sterilizer inspected or repaired, then test it again in three consecutive fully loaded cycles.
What records do inspectors usually ask for?
Inspectors usually ask for:
- treatment protocols and standing orders
- patient charts with PHI accommodations, treatment records, and consent forms
- medical director agreements and staff license verifications
- infection control protocols, OSHA documentation, waste disposal logs, and equipment maintenance records